Friday, April 22, 2011

Guest House Part II: Primed and Ready to Go

After a week of spending our spare seconds inhaling oil-based primer, the guest house is ready to be painted.

This ended up being way more annoying than expected, as are most home improvement project as I'm learning.  The actual panels weren't bad since we could use the roller, but all the window sills, corners, and spaces between the panels were a huge pain.  I was originally going to leave the trim and windowsills natural wood, but it looked funny so I ended up painting. 

Primer is also kind of an awful thing.  I really think the inventor of primer was kind of an a-hole who decided to make it an awful gray color that goes on totally unevenly.  That way, when you're too far into your project to ever turn back, you keep looking around thinking "oh wow, this is going to look TERRIBLE." 

That all said, it wasn't horrible.  I actually find painting fairly relaxing.  I sit in a chair thinking and writing all day for work, so it's kind of nice to shut my brain down for a few hours and just make sure I'm painting in the lines (and not dripping on the floor).

Here's some pictures of the progress:


See what I mean about the uneven-ness? I think this is normal after priming, and I've read it's just important that the whole surface is covered, not that it's covered evenly. Let's hope that's true, because I really don't know if I can handle doing too many more coats.  We used Kilz oil-based interior primer which is supposed to be the good stuff, so hopefully it'll be able to block as much of the panelling as possible before we throw on a coat of white paint.

Even though it looks kind of ugly, I'm starting to see what the finished project might look like.  We're gathering up odds and ends of furniture and I really can't wait to start putting everything together.

Thursday, April 21, 2011

Guest House: Before

One of the coolest things about our new house is the semi-detached guest house.  Our house is a fairly small 1200ish square feet, but the guest house adds another 250ish square feet and has it's own bathroom and kitchenette.  Although we didn't set out looking for a guest house (obviously, very few houses in our price range had one) it ended up being a really cool feature that we thought had some fun potential.

That said, we've totally ignored the guest house since we moved in.  Well, since a few days after we moved in, since we slept in there as we were waiting for the new wood floors to dry.  Since then we've been so focused on the main house and all the immediate projects that somehow the extra little room hiding in the back yard wasn't really first on our minds.  I don't even think I went in there until about a week ago when I commandeered it for a wood shop to build my end tables since the garage is still full of stuff.

Then we realized we have guests coming to visit in 2 weeks....and they probably want a place to stay.  We have a guest room in the main house, but it's currently a dog room with nothing in it except a dirty area rug, a dog crate, and some dog beds.  Pretty inviting if I do say so myself.

So, I thought I'd take the opportunity to at least take a shot at fixing up the guest house.  Since we first set eyes on the room, I've been swearing I'm going to paint over the wood panelling.  Yes, it's kind of rustic and cool...but it's not my cup of tea.  I do have to admit that when we stayed in there it felt nice and cozy, but, when was the last time you walked into an entirely wood panelled room and thought "WOW, this is NIIIIIIIIICE!"

Sean wasn't 100% behind the idea - what is it with guys and wood panelling? - but I managed to convince him it was a good idea.  Sidenote: Sean doesn't think anything is a good idea unless we "need" it.  For the record, he didn't think we "needed" to buy a bed frame for our guests to sleep on because we could just put the mattress on the floor and call it a day.  Yep.  I'm pretty sure if Sean was in charge our furniture would consist of totally practical cinder block-based products or somethhing.  Another sidenote: this is what happens when I write blog posts at 1am after painting with oil-based primer for a few hours.  A little loopy and sidetracked over here.

Moving on - I'm actually about 3/4 of the way done priming, but I thought I'd share some before pictures of the lovely panelling.  I have to admit it's not horrible, which made this project a little nervewracking because as far as I know there's really no way to undo painting over wood.  If it looks crappy, it looks crappy forever.  I was also a little nervous because these weren't nice smooth wood panels, they're actually fairly rustic looking and also about 70 years old (I think - the guest house was built in the 1940's and I'm assuming the panels are original). 
So, here's what the guest house looked like before I potentially ruined it forever:

I think we're going to keep the roof and beams natural.  I think they look nice, and also I hate painting ceilings and so I'm hoping to avoid it at all costs.


This awesome light fixture is also going to have to go, except I'm the worst at picking out new light fixtures (see, e.g., the live wires still hanging out of the living room wall).


Another view - the splotchy bits are where we started patching some of the more obvious holes in the panelling.


The fireplace is going to stay brick, I think, since it's pretty non-offensive and I'm pretty lazy.


So, here's what's on the to-do list for the guest room quick renovation:

1) Prime the room with oil-based primer
This is about 75% done - it's been quite a pain and I hope I'm doing it right.  Oil-based primer is crucial for painting over as something as dark as wood panelling.  I didn't realize how much trim and detail work there was until I started painting, yikes.

2) Paint with white paint
We have a million gallons of Home Depot's Freshaire paint since it was recently discontinued and selling for $5.  I'm hoping the plain white we bought will work on the walls - I'm imagining kind of a whitewashed beachy look since the wood panels are kind of rustic.  We'll see how that vision turns out.  I also hope it takes less than 3 or so coats since judging by how long the priming is taking I'm getting nervous that we're not going to finish on time.

3) Add furniture
Working on this one as well - so far we have a mattress (already owned) and a newly procured wrought iron bed frame I snagged on craigslist.  We just replaced our own bedroom furniture so we'll probably throw our old stuff in the guest room for now.  I'm also hoping to find a craigslisted/thrift store small round table and chairs and any other furniture that works in this tiny space to make our guests feel at home.  I'm hoping for a beachy/cottage theme, so it may take a while for the right pieces to come along, especially since we're trying to do this super cheap.

4) Get rid of the antique stove
This one kind of pains me.  The guest house currently has an antique O'Keefe and Merritt stove that is totally adorable and fits the character of the guest house.  However, it's also leaking gas and will require some kind of repair.  As cute as it is, we're just not sure if a guest house kitchenette needs a fully-functioning oven and it kind of seems like an unnecessary thing that could potentially burn the entire compound down.  We're thinking of replacing the stove with some storage space and a microwave...it won't look nearly as darling but for once I'm leaning towards Sean's practical point of view.

5) Decorate/make pretty
Realistically this isn't going to happen before our first guests arrive...but a girl can dream!

5) Prepare guest house as vacation rental
Hey, what now?!  More on this later, we're brewing up some ideas for some possible income potential from the guest house.

So that's it for now, stay tuned for more updates!

Friday, April 15, 2011

Building fun

Oops, I swear I didn't forget about this thing.  Actually, the guilt of not posting has been plaguing me.  It's just that there was an impromptu weekend trip to Houston, a basketball final to watch (and too much tequila to drink), work stuff, a foster dog...and, oops, next thing you know I haven't posted in two weeks.

To  make up for all my laziness, I had a super productive weekend.  I finished a project that I've been working on since pre-Houston.  The problem with having a million different things to do on the house is that it's really easy to get distracted and start new projects before I finish the old ones.  I can't explain why 1/2 of the living room trim has been taped off and un-painted for over a month now, I just can't, but we're getting a lot of other things done!

My latest building project came about due to the awkward setup of our living room.  The room is long-ish and narrow-ish and has a really awkward layout, so we decided to use our sectional couch to split up the room and form two distinct areas.  This will make more sense when I post pictures of the room at some point in the future (but not today because I didn't take any - sorry!).  Anyhow, due to the new setup, our chunky Crate & Barrel coffee table just wasn't going to work.  However, since we're kind of lazy and our couch is like command central, we needed a place to put drinks, food, laptops, etc.  I'm planning on eventually buying/building a long console table behind the couch, but I haven't really figured out what to do there yet.

Enter the wonderful http://www.ana-white.com/, home of amazing and surprisingly not that hard to build furniture designs.  I saw the plans for the rolling c end table a while back and it didn't really catch my eye, but when I started thinking about table solutions for the living room I looked up the plans again and decided to give it a shot.  It doubles as a side table/sofa table/anything you want table so I thought it was a good solution for our smallish space.

I forgot to take a before picture, so just imagine a pile of plain boards from Home Depot.  Then imagine me doing some circular sawing, drilling, gluing, sanding, filling, etc.

Then these appeared!


They were actually really easy to build, the most time consuming part by far was sanding and filling holes since I wanted these to look nice and sleek when painted.


Then the problems started.  Paint.  For some reason the brilliant idea popped into my head to spray paint the end tables.  I imagined it being amazingly simple, with stunning results. 


It started out OK - I used a can of primer on both tables since I was dealing with bare wood.  It went ok, and I thought I was getting the hang of it except for the hand cramp from spraying. 

Then things started going downhill.  I had decided to bring some color into the living room since it's looking awfully grey in here lately.  After 15 minutes of harassing the guy in the spray paint aisle for design advice (he really didn't care about my color questions), I decided on a dark purple-y color and a light green.  After deliberation with Sean at home, he picked the light green, so of course I decided to paint the tables dark purple.

There are no pictures of this stage because I was too distraught.  Let's just say I am not destined to be a spray painter.  Everything I read said to do multiple light coats, but I just couldn't get the hang of it.  I tried to do what I thought were light coats, and ended up with totally uneven coverage with primer showing through in some spots and drips of paint in others.  So.  Not.  Pretty.  And neither was the color - it looked different from the can and was very, uh, purple. 

This is where the day got a little stressful, and I headed back to Home Depot to grab some regular paint to try to salvage my poor tables.  Multiple trips to Home Depot in a single day is not really my idea of fun, especially since I somehow always get lost and it takes forever.  However, once I got there I totally lucked out and found a $5 oops gallon of $30 paint in the exact color I wanted - I think the paint gods felt bad for me after my spray painting debacle.

Removing the horrible purple paint was, well, horrible.  I didn't just want to paint over because it was so uneven, so I ended up sanding it all off which also sucked.  My power sander kept jamming up so I did it all by hand.  I also unintentionally created a kind of cool tie-die finish.


Cute, but didn't really fit in the living room.

So, after sanding and sanding and sanding, a coat of oil-based primer on the tie-die table, and a few embarassingly easy coats of paint with a teeny roller, I was done.  I have no idea why I thought it would be so much easier to spray paint, rolling it on was so simple.  I did 3-4 very thin layers of my $5 semi-gloss paint, and let it dry for about 24 hours.  I'll probably put a layer of some sort of sealant on top to protect things, just to make sure.

Here's the finished product:


Overall I'm really happy with how they came out, and Sean was totally right about the color.  They're not perfect, but I'm not sure homemade furniture is supposed to be.


Here's Ernie, demonstrating the side table usage.

...and another view after I shut the dogs outside.

I really like these and I think they're a good fit for us.  I didn't add up the exact cost, but I think it was somewhere around $40 for both, including paint.  Not too bad, right?

Tuesday, March 29, 2011

Fireplace before and after

We may be the only people in the world who aren't a fan of fireplaces.  I don't really understand the point in Southern California (it's warm here, if you haven't heard). 

Our living room fireplace takes up most of one wall and two of the other walls are filled with windows and/or archways.  So, the fireplace has also made living room setup quite a pain - you can't exactly stick anything in front of it and pretend it's not there. 

That, and it was kind of ugly.

(excuse the poorly lit iPhone pictures, including the second one which seems to have stretched poor Sean out)


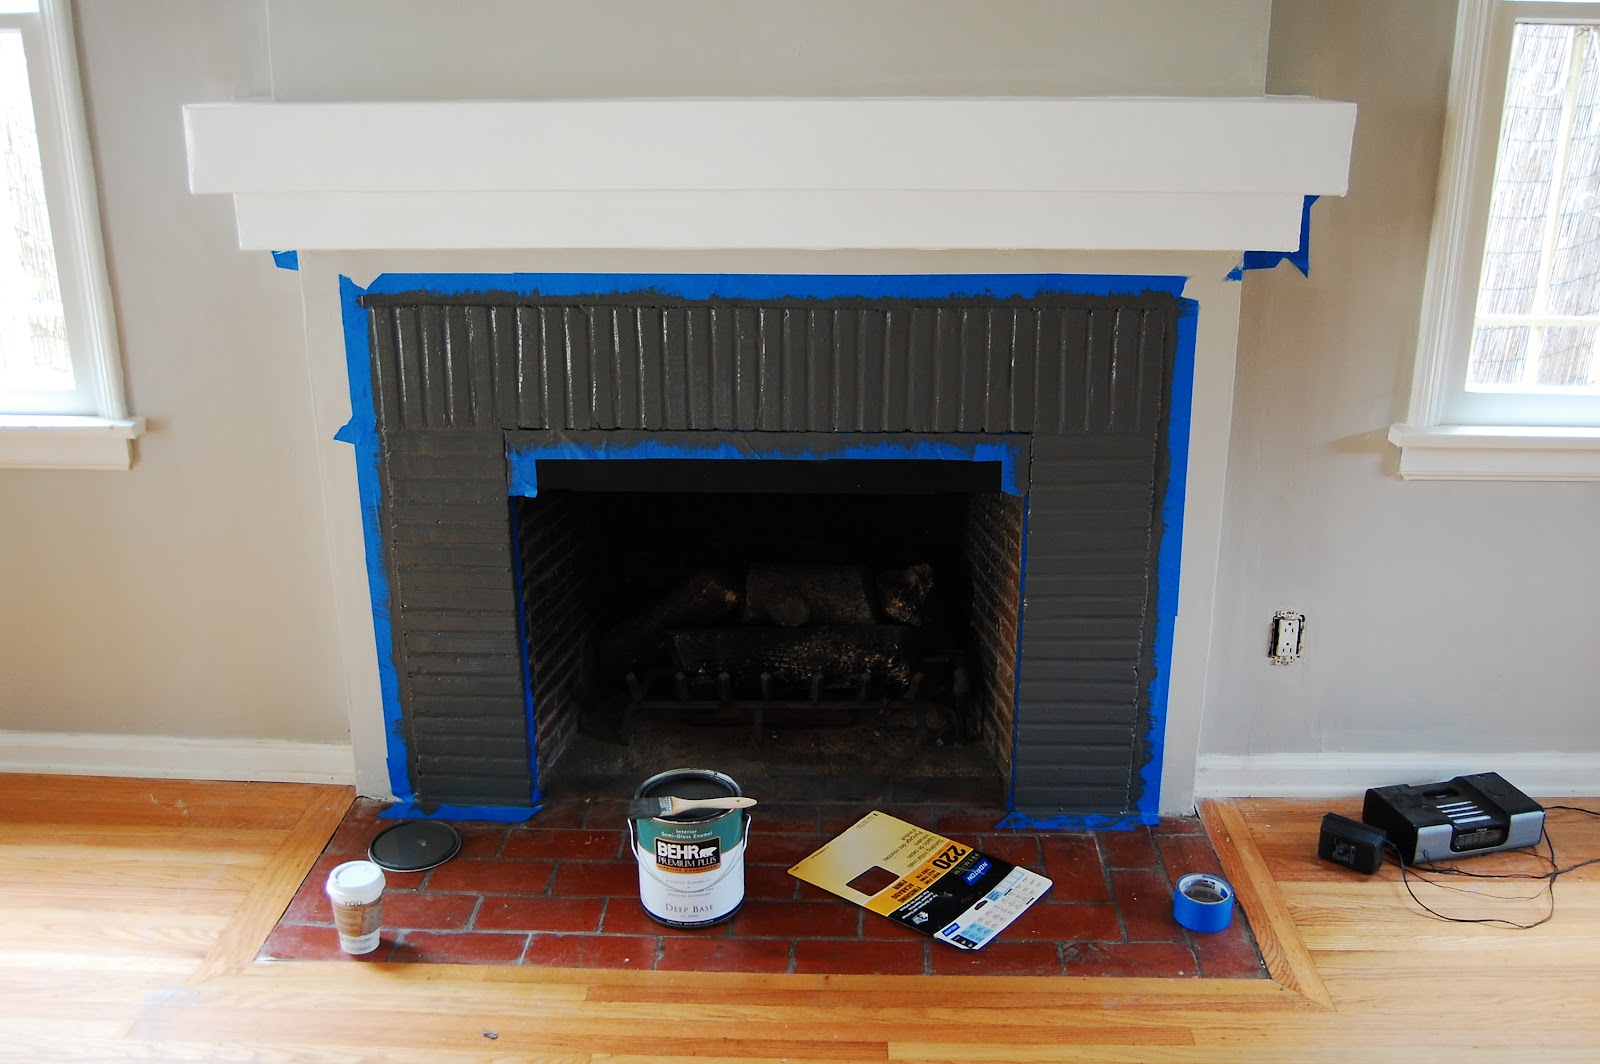
We weren't a big fan of the red paint and brass fixtures - they were outdated and really sucked light out of the room.


...then we figured out we could remove the fixtures, which made a big difference in opening up the room...


...then Sean brought home a $5 can of charcoal-colored "oops" paint at Home Depot and I got to thinking....then taping...then painting.  We also painted the area around the fireplace to match the walls, and gave the mantle a few coats of white semi-gloss paint for more of a modern look.


...and this is the final result!  Terrible picture and dirty floor, but (if I do say so myself) the fireplace looks much better.  It feels more fun and modern and basically more our style.  I know it's cliche but it really never ceases to amaze me what a change a few coats of paint can make!

Speaking of paint, the wall paint looks like a totally different color in the last two pictures, but it's the same (Glidden colormatch of Benjamin Moore's Revere Pewter).  Depending on the light it really morphs from beige to grey.

Sunday, March 27, 2011

Progress!

Despite my constant state of stress and feeling like we're not getting anything done around here...we are, in fact, getting things done around here.  None of the rooms are finished but we've been focusing most of our attention on the living room and master bedroom and they're getting there.  The other rooms...let's not talk about that.  I'm trying not to have too much renovation ADD, which is tough because it's so easy to ignore the things you don't want to do (I'm looking at you, living room baseboards) and move on to more fun things (which is why I just spent 3 hours building furniture in the back yard).

Anyhow, I promised some master bedroom photos today and so here's a few before-and-afters.  Assuming that "after" means "after just a little bit of progress and no decorating."

Before:


The small size of the universe glued on the wall is totally out of proportion with what a huge pain in the ass it was to remove.  Don't even get Sean started about the 170 glow-in-the-dark stars he peeled off the ceiling.  Yes, he counted.

After:


Horray for a smooth ceiling and walls!  We painted the walls Glidden's Navajo Sand after trying (literally) about 10 different colors.  For some reason the light in this room makes every swatch of paint look about 57 shades darker than it did in the store.  I originally thought this color was too close to plain off-white but (Sean was right) it actually reads as the slightly darker beige we were going for.  I want to keep the bedroom pretty light and airy so I thought a nice light neutral color on the walls would be a good place to start.  But really I don't know what I'm talking about.

This picture also gives a sneak peak at a little hallway makeover - when we had the floors re-done the floor guy also removed the fugly and non-functioning floor furnaces for us and put drywall/new wood floors in their place.

Before:


I pulled about a million screws out of the old, crumbling plaster walls.  Then re-plastered.  Then sanded.  Then cried.

After:


I tried to match up the camera angles for the before and afters but it looks like I did a pretty terrible job of that, huh? 

If you can't tell, the window treatments are a work in progress...I mean I think that curtains nailed into the top of the window frame look really nice but I'm thinking actually curtain rods may look even better.  The bedroom windows face the house next door so I needed to get something up quickly. 

The floral curtain is a test.  Florals are totally not my style, but I saw this design on display at World Market and it grew on me.  I thought the colors could be worked into the rest of the room when I get around to decorating.  I was originally going to put up my usual white curtains because I wanted light and airy, but then I thought they made the room look too flat.  The jury is still out on these but I picked up 2 sets on sale (for $22 a panel) just in case.

Before:


Another angle.  Also not shown: the peeling drywall tape on the ceiling that had to be removed...which left a 2" wide strip on the ceiling that had to be patched and sanded as well.  It was uuuugly and took an outrageous amount of time to fix. 

After:


These photos totally didn't line up at all.  Oh well!  This angle shows the original white curtains that I hung/nailed up - too flat, right?  Also shown: the chunky ikea dressers that we bought when we first moved to CA that are on the list to be replaced, and my beloved vanity.  I'm not sure if the vanity is going to live in this room forever but I love that it's in front of a window.  In our apartment my vanity got no light so if you ever saw me and thought "did she put her makeup on in the dark?" you were right, I totally did.

We also painted the ceiling and the crown molding and trim.  So much fun...which I think is why I'm taking a break from painting now.

So that's the master bedroom in it's current state.  Definitely a LONG way from done, but I think our standards are low because I'm just happy to have a room not covered in dirt and dust.

Saturday, March 26, 2011

Work in progress...

So my idea to post every day kind of went to hell.  Oops!  I had a crazy work week with a few 12-15 hour days which made updating a little tough.  Things are moving along here and I'm getting behind on updates, so I wanted to share some progress photos from a few weeks ago to show everyone (and remind myself) where we started.  This was the week before we moved and we had a ton of little projects we wanted to get out of the way before the floors got refinished and we moved in.

patching holes in the walls is not fun!


Dryer drama - it helps to measure your laundry room correctly before ordering a washer/dryer set.  Or you'll end up with a dryer in the dining room.  (Note the sponge-painted beams...shudder...)


Sanding the ceiling leads to creepy photos like this


...and this.  I'm married to this guy and I still think this is the weirdest thing I've ever seen.

So. Much. Dust.

Hard work even for our helpers.


I learned that an awesome homeowner thing that can happen at 11:30pm on a work night when you're cleaning up from painting is when the ancient pipe heading to the kitchen faucet breaks and starts spraying water everywhere.  At least the plumber complemented my electrical tape patch job (after charging us $400 for a new faucet).

How's that for some random updates, eh?  Usually I only remember to take photos at the last minute, but I'm glad I do because things are changing pretty quickly around here.  I'm sure things will level off eventually once we finish our top priority projects (we still don't have a new fence or a garage door...oops!) and hopefully I can do some more in-depth posts instead of cramming 7 random photos with some descriptions and calling it a blog.

I'm planning on posting some updated bedroom photos (hint: we cleaned up all that dust) tomorrow so stay tuned!

Wednesday, March 23, 2011

Badly painted trim haunts my dreams

Another...uh...questionable design choice of the past owners is the weird paint brownish paint color that appears throughout the house.  It's not even brown, it's like a peachy-brown-horrible-pukey color, unevenly applied to fixtures like trim, ceiling beams, and the kitchen cabinets.

Behold:


 This color covered all of the crown molding in the living room and dining area.  That's a lot of crown molding.  The molding itself is original to the house (I think, who knows, I'm making stuff up as I go along) and in decent shape.  It looks like it's made of plaster (again, making stuff up here) so the various cracks give it charm, I think.  Brown paint, not so charming.

One of my first projects was getting to work on painting over the horrible molding.  The uneven brown paint just made it look dirty and the effect wasn't pleasing on the eyes.  I picked up some Home Depot Freshaire paint in semi-gloss - this brand is being discontinued and it was on sale for $14, later on clearance for $5 so I literally have 10 cans - and went to town.  I'd never painted trim before, and I ended up using painters tape only along the bottom of the molding.  Since the molding is old and uneven, I thought using tape would give me a cleaner line along the bottom.  This method worked pretty well, and I didn't care about getting paint on the ceilings since they were scheduled to be re-painted as well.

Painting trim was my after-work project for over a week.  Every day I'd drive to the new house (which we hadn't moved into yet) after work at 7 or 8, change into my painting clothes, and paint for a few hours.  Really fun.  Check out alllll the dirty-looking crevices I had to fill with nice white paint:


It took FOREVER.  I had to do 3 or 4 coats of white paint to fully cover the brown, which is a really daunting task when you're looking around the room at a huge expanse of ugly trim at 9pm on a Tuesday.  But I finished!  All of the crown molding is now finished and it looks fab, if I do say so myself. 


(this picture was pre-ceiling painting so please ignore the dingy dirty ceiling)

It makes such a difference in the room that I'm now seriously considering re-painting the kitchen cabinets until we get around to a kitchen remodel.  It looks so crisp and clean against the newly painted walls, I'd say that it was worth the effort despite how miserable I was at the time.

Now to finish painting the baseboard and the rest of the trim around the house.  The fun just don't stop around here!