Saturday, January 28, 2012

Let there be (new dining room) light

I have a serious Craigslist problem.

I have wanted this:


firefly pendant light for-ev-er. Like since before we even bought our house.

I first saw it on a listing website for a house that we never even looked at (here - by the way how awesome is the photographer than this teeny house looks so amazing?) and I knew I needed one in my future home.

We've been dealing with a fugly big ceiling fan in the dining area since we moved in. 


We turned it on exactly 0 times.  There's obviously a giant sliding door in the dining room so if we want some air we just...open it.  So, the fan had to go.

One weekend I got particularly annoyed and in about 10 minutes, dismantled the fan.  The room looked amazingly bigger and more open.  Sean was amazingly unphased by the fan on the ground and live wires hanging out of the ceiling.  I think he's used to my erratic behavior.

Since the big hole in the ceiling meant that it was game time, I also finally resolved to buy the firefly pendant to replace the big ugly fan.  CB2 was having 10% off at the time so I figured $200 or so with tax was do-able.  Buuuut, I figured I would check out Craigslist first, juuuuust in case. 

Aaaaaaaaaand I found a brand new firefly pendant for $150, holla! 

Duh I talked the guy down to $100. 

I started installing it myself, but then I got a little nervous because the wiring looked old and I started having visions of electrocuting myself and burning the house down, so I called a local electrician.  It only took the pro 10 minutes or so to install the light, and he only charged me $50 AND he complimented my half-done wiring job.  

I can't even express how happy I am with this light.


The lighting in the dining room is really awkward whenever I try and take photos.  But you get the idea.


See anything unusual in this photo?


There he is!


By the way, I've heard the most important part of a camera is the lens.  So I went out and bought a $10 wide angle lens on Amazon.  Isn't the quality astounding?  In all honesty, I kind of like the effect.  You can see way more of the house and I kind of dig the retro looking black edges.


Is that enough light pics for you?

With the new table and the new light, it's starting to actually look like a real dining room!  No more crappy ikea table, mismatched chairs, and giant ugly ceiling fan!  After almost a year of living in this house it feels like it's actually coming together.  Yippee.

By the way, we're totally digging the new table.  The benches are surprisingly comfy and easy to push out of the way.  I'm still so-so on the buffet with the table, but it works for now.  As I'm looking at this photo, I reallllly want to hang some art on the wall to the right of the table.  Someday, someday we will hang art in this house.

Wednesday, January 25, 2012

Addicted to the flea market

I'm becoming seriously addicted to the Melrose Trading Post. I feel like every time I go I end up seeing way too much stuff that I like. Which reminds me, I still have a bunch of empty frames in the garage I need to figure out what to do with. Oops. 

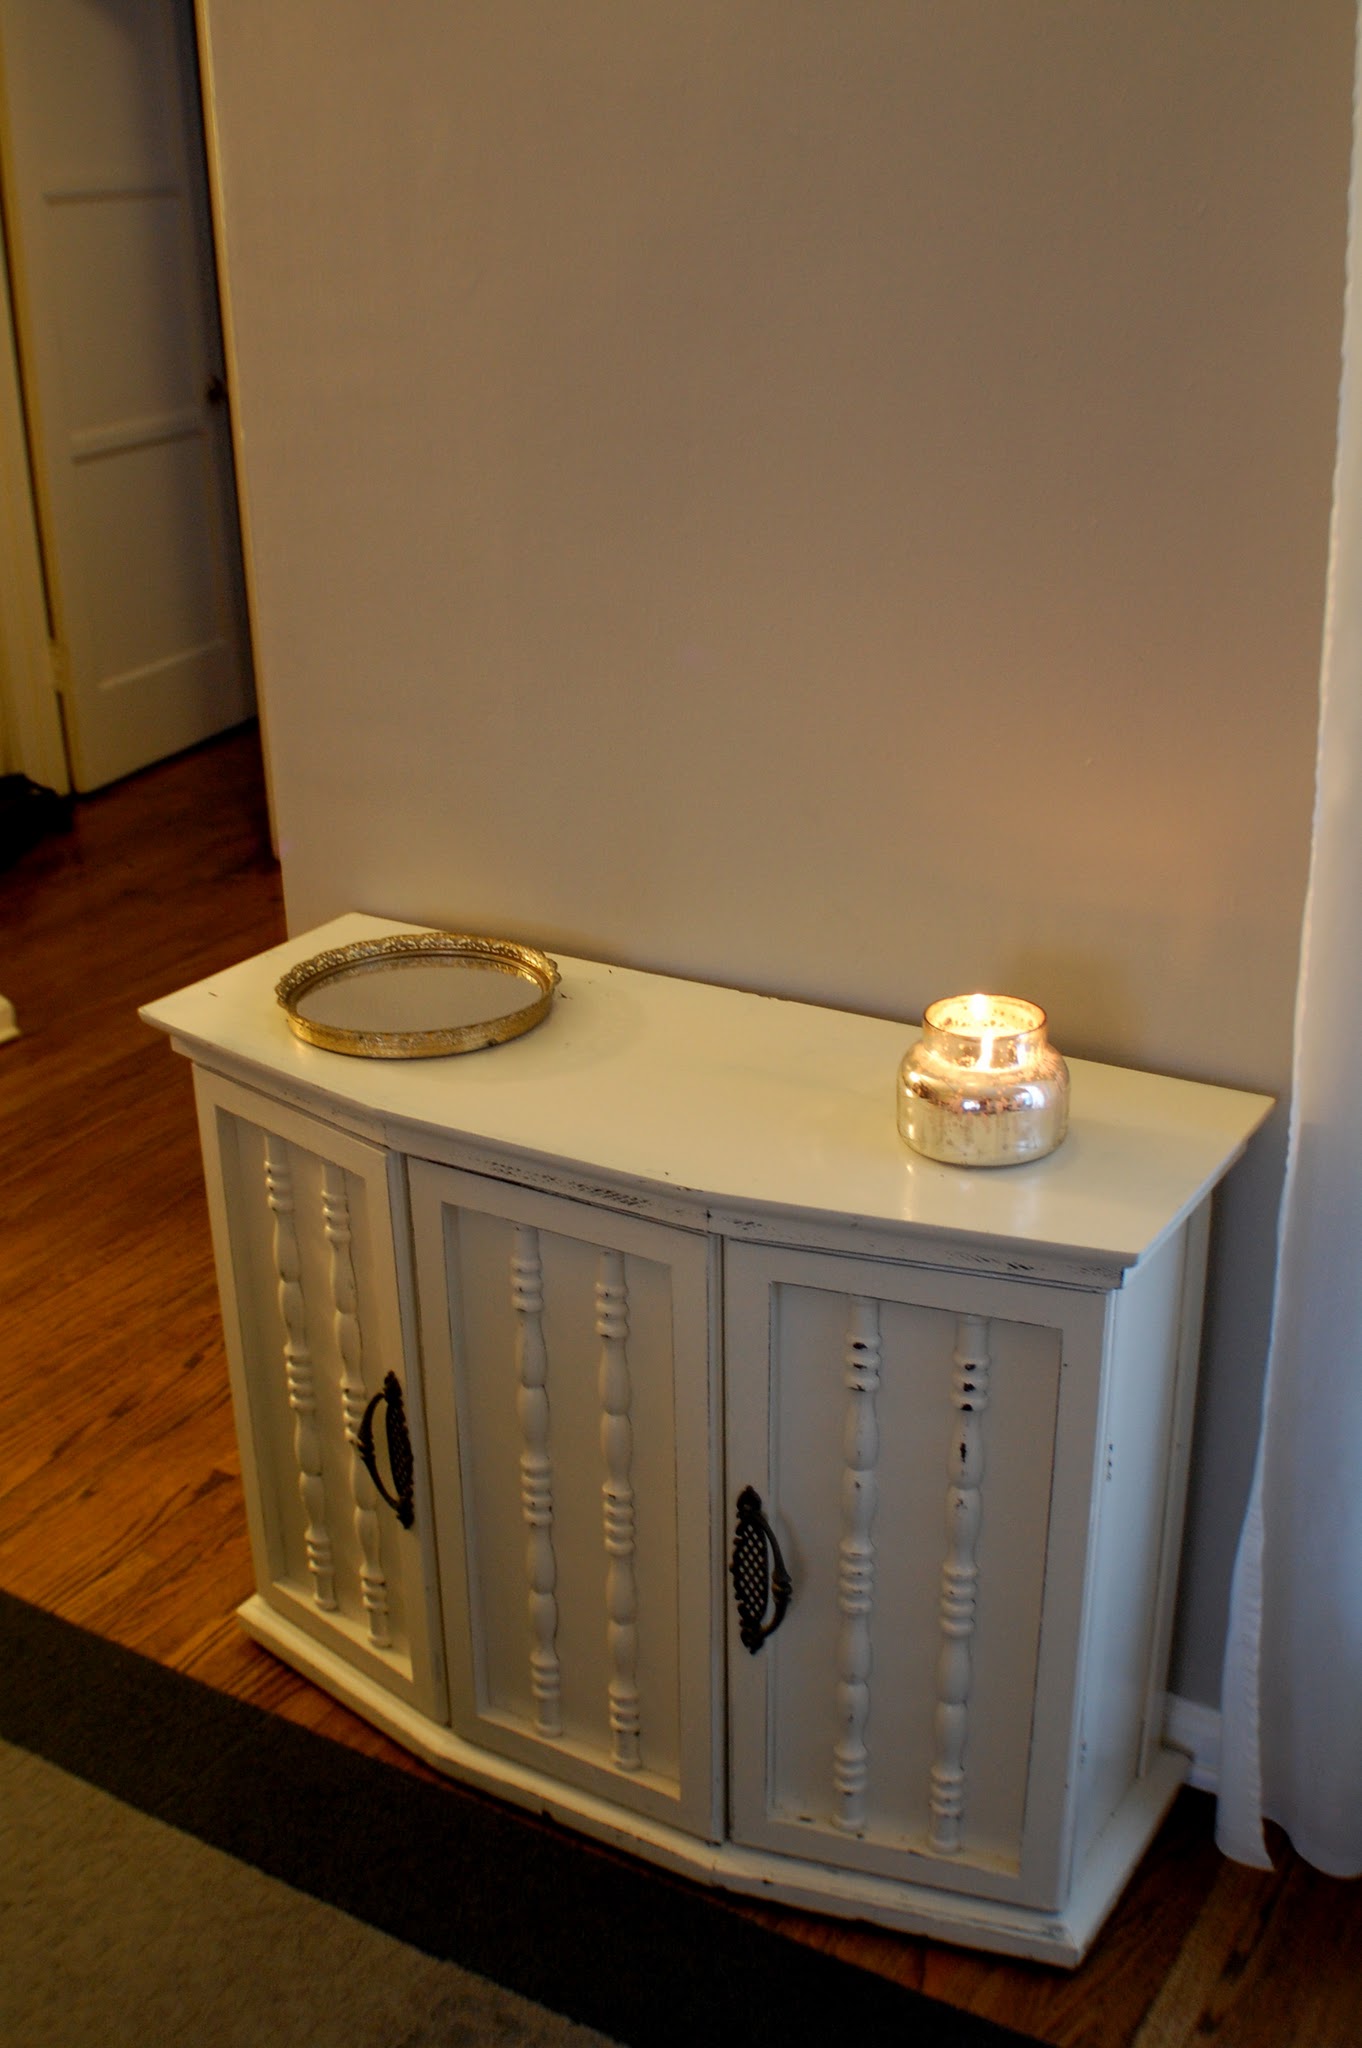
Anyhow, on my most recent trip with my decorating accomplice Marissa, I came home with this darling little...I don't know what to call it.  Cabinet?  Sideboard?   I don't know. 


I did an initial walk by and when the lady told me she was looking for $60 I kept walking. But then I had to drag Marissa back when I couldn't stop thinking about how cute this little table/cabinet/whatever would look in our living room. And I do believe it looks pretty adorable. 


I talked the lady down to $45 which I'm happy with. It's solid wood, with a fairly crappy white paint job. It's the kind of thing I could probably find for way cheaper unpainted at a thrift store or craigslist, but I liked this one enough to grab it in the moment.


I dig the detailing, and it really fits perfectly in the spot. I threw some stuff on top for now, but I'd love to add something with a little more height.  Maybe a vase or something?  By the way do you like the dirt smear on the wall?  Thanks, dogs.


It sits in front of an outlet, so I want to cut an opening in the back and use it to store our laptop cords when they're not in use.   Previously we let the cords just sit on the ground in front of the outlet which also looked super classy.  Note the unpainted interior.  Yum!  Oh and the blurry Mabel head ruining my shot. 


Bonus living room shot to show how the cabinet fits. I swear at some point, possibly before we've lived in our house for a year, I will hang things on the living room wall.

Wednesday, January 4, 2012

The table...it has arrived!

I had this post written up and awaiting photos a few weeks ago, and then it got eaten by the internet.  And then we went on vacation.  Actually, we're still on vacation, but it's raining in lovely London so I'm inside on the iPad catching up on the blog. 

Last I spoke of our new dining room table, I was anxiously awaiting a November delivery date. Then November came and went, and I got an e-mail from West Elm saying that my table was due to be delivered sometime in January.  So.  Not.  Cool.  I ordered this table in SEPTEMBER, and the benches had already been assembled and chilling in my living room since then. 

Luckily, a new West Elm store had (literally, that day) just opened in my 'hood when I got the most recent backorder e-mail.  I called the new store, and lo and behold they had a Carroll table in stock!   I previous had called every store in southern California to no avail, so I was kind of ridiculously excited. 

I drove over to the new West Elm on Beverly the next day, and it was amazzzzzzzing.  The new store has a really cool, less preppy vibe than the Santa Monica store, and it's way easier to get to from our house than the Santa Monica location.  Maybe it's new store enthusiasm, but the employees were super nice and helpful, and I went on opening weekend so I snagged some free coffee and pastries while I shopped.  Best shopping experience ever.  

Better yet, they had my table! And they were willing to honor the online sales price from September, aaaaand since I arranged to pick up the table in store I saved over $100 on shipping and delivery charges. A few days later when the table arrived from their warehouse, I went back to West Elm and was able to cram the entire table (disassembled, duh) into the back of my Honda Insight. A few minutes of assembly later...and we have a table! 


(and a sneaky little doozin trying to climb on the kitchen counter as I take pictures) 


For some reason the lighting in the dining room is always off no matter what time of day, so the pictures never come out quite right.  Boo.  I also have a lighting update for the dining room, so I don't want to give it away just yet, so ignore the awkward angles.

I really like my long lost table. I think it looks more orange than it really is in these photos, but it's a nice medium brown that will hopefully blend well with the rest of the main living area.  I'm not totally digging the black buffet in the dining room any more, but it's super functional so I'm brainstorming ways to make it work.  The blue chair isn't always at the head of the table, but it kind of works.


The lines are pretty chunky, and it's a super sturdy table.  It's solid wood so I'm hoping it lasts for a long, long time.  I'm quite impressed by the quality to price ratio - after saving on shipping costs, the entire set cost just over $900, which is the price of just a table at a lot of mid-range furniture places.


In sum, I love my table.  I do not love the West Elm back order, but they came through in the end.  I think the dogs like the table too - Mabel thinks it's her fort and can usually be found hiding under it, and while Ernie isn't a huge fan of the benches he usually makes himself cozy on one of the blue chairs that float around the living/dining area.

Monday, November 28, 2011

In which I make a really simple table

Ages and ages ago, back when we were still apartment dwellers without any tools or space, I saw this DIY reclaimed wood bench online and fell in love. It had to be mine someday. Not this one specifically, but an awesome reclaimed wood bench with industrial-style metal legs. 

Fast forward a few years, and we were in need of a sofa table. Due to our somewhat awkward living room setup, there's not really room for a coffee table. My DIY side tables work pretty well, but I've wanted a sofa table behind the back of our sofa to get some good use out of that area.  We had our old coffee table chillin' behind the couch until we sold it on craigslist, but it looked terrible and was totally the wrong size.


Awkward, right?

So, what better solution than to DIY a sofa table version of my beloved reclaimed wood bench? 

This table was freakishly easy. Ok, maybe not entirely, but the concept at least. 

First, I sent Sean to buy a huge stab of re-claimed pine at E&K Vintage Wood, here in LA.  And I can't say it was cheap.  I nearly had a heart attack when Sean told me the price, but he assured me it was a beautiful piece of wood (that's what she said).  It's got lots of really quaint imperfections, that scream "I was expensive and not purchased at Home Depot."


The damage was $17/foot for a slab of 2x10x13 Oak, but they only sell in the sizes they have in stock, so we bought 13 linear feet.  So we paid $221 for a piece of old wood.  I know, I know, we're stupid yuppies, but what are we going to do, we live in LA and we can't exactly drive on down to grandpappy's old barn to grab some beautiful reclaimed wood.  They cut it for us into 3 pieces - 1 5-foot or so piece for the console table, and 2 other pieces to sit in the garage until we figure out a use for them.

Then, it was as simple as ordering 4 legs online at hairpinlegs.com to complete the materials phase. 

The hardest part of this really simple project was sanding down the wood. It was in pretty rough shape, so it took an hour or two with varying grits of sandpaper to get a nice, smooth finish.  During which time I'm sure my neighbors cursed me for using my small but incredibly noisy hand sander outside on an otherwise quiet Sunday afternoon.  Take that, tuba player in the apartment complex next door.  Anyway, I haven't yet put any finish on the wood itself, which I should probably do at some point.  I'm just not sure what. 

Back to the table building tutorial.  Um, then I screwed the legs in.  It was really that simple. 

Here's a picture: 


...but if you need step-by-step instructions for this...you probably shouldn't be operating power tools. 

So, now we have a table.


The total cost was $100-somethingish if you only count 1/3 of the wood cost, so it definitely could have been cheaper.  But still a decent price compared to some fancy store bought industrial-type consoles I was looking at (see here and here).


Oh, the cool box?  I'm glad you asked.


I bought it at the same time I bought my bar cart at Magnolia and Willow.  They had a bunch of these cool old tool boxes that I promptly fell in love with and bought several of.  I think this one was $15, or something.  It was kind of grungy, and I'm sure some old gruff mechanic was rolling in his grave as I cleaned out his oil-stained tool box with eco-friendly citrus cleaner so I could use it as a decorative accent.  Whatever, dude, I like it.  I kind of like having it on display, and I use it to store dog toys and other random junk I want to hide from company.

That's it for the latest living room update.  I'm digging it.  I was worried the decor was becoming a little too modern with my Crate and Barrel media stand and the new West Elm chairs, so I'm trying to bring it back old school with some more vintage-y type things.  

Kitchen Update: Part III

Ok, it's the moment you've all been waiting for! Yep, all 3 of you.

At long last, our mini kitchen re-do came to a close. Putting the cabinets back up and installing the hardware was almost as horrible as taking them down. In all honestly, I am very impatient and often have poor attention to detail when it comes to home projects, and so the detail work on these cabinets was not fun. And I couldn't for the life of me figure out how to screw the self-closing hinges into the wall correctly. And a few of the handles are unquestionably crooked. And some of the doors don't line up so they don't close properly.

But, it's done! Horray! I told myself that I may fix some of the above problems sometime in the future, but I'm not holding my breath.

And so, the after photos. I'm sticking them side by side with the before photos from (sort of) similar angles so you can really be amazed by my handiwork.  I'm actually not pleased with how these "after" photos turned out, the lighting was funny and such, but I really don't feel like re-taking them.  Sorry guys.


I reallllly like how the wall paint turned out.  It's the darkest I've ever painted a room, but I think it works with the white cabinets and stainless steel.

Notice the lack of gross grease stain on the ceiling?  Hours of scrubbing.  Not even exaggerating. 


The off-white microwave looks pretty bad next to the shiny white cabinets.  We're casually looking at a  new stainless steel one, but it seems a little extravagant since the white one works just fine.  


Ok so that bottom cabinet is a little crooked and I didn't close it all the way.  Oops.


I have since hung curtains.  I should probably update more so my posts aren't immediately outdated.


Our Miele dishwasher has a removable cover thing that we could replace for a stainless steel one, but I think it looks fine just painted white. 


Gross story - we thought the glass on this light was off-white.  Nope.  It's white.  It was just horribly dirty.  Also don't love this light fixture, but it's fine for now.


Close up of the paint and tile matching.  I like it.

So, that's it for the mini kitchen update.  It's still not perfect, but the total cost was only about $150 for cabinet hardware and paint (and a good chunk of my sanity).  The result is SO MUCH better than the kitchen we moved in to, and so if we don't get around to a full kitchen reno soon (or ever), I think we're both OK with that.

In the meantime, I've slowly been accessorizing and trying not to go too crazy with turquoise theme - you can see some of my wish list at http://pinterest.com/juliemarianne/kitchen/.

That's all for tonight - I hope you like the (sort of) new kitchen as much as we do!